728x90
1. 리스트 컴포넌트
▷ 목록 중에서 항목을 선택할 수 있는 컴포넌트
▷ JList : 목록에서 하나 이상의 항목을 선택, JComboBox : 버튼을 클릭시 목록이 보이고 그 중 하나를 선택
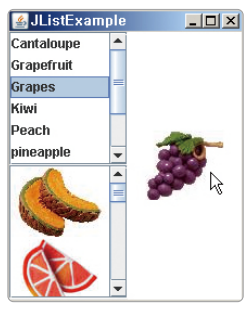
(1) JList
▷ 목록에서 하나 이상의 항목을 선택할 수 있는 컴포넌트
▷ Vector 객체로 줄 수 있고 기본적으로 JLabel로 구성되어 있기 때문에 텍스트 이외에도 이미지 표현도 가능
▷ 자동으로 스크롤 바가 생성되지 않으므로 JScrollPane에 추가해서 사용할 수 있음
◎ JList를 이용한 사진 선택 예제
import java.awt.BorderLayout;
import java.awt.Color;
import java.awt.GridLayout;
import java.util.Vector;

import javax.swing.ImageIcon;
import javax.swing.JFrame;
import javax.swing.JLabel;
import javax.swing.JList;
import javax.swing.JPanel;
import javax.swing.JScrollPane;
import javax.swing.SwingUtilities;
import javax.swing.event.ListSelectionEvent;
import javax.swing.event.ListSelectionListener;

public class JListExample extends JFrame {
	private JPanel pWest;
	private JList listString;
	private JList listImage;
	private JLabel jLabel;

	// 메인 윈도우 설정
	public JListExample() {
		this.setTitle("JListExample");
		this.setDefaultCloseOperation(JFrame.EXIT_ON_CLOSE);
		this.setSize(250, 200);
		this.getContentPane().setBackground(Color.white);
		this.getContentPane().add(getPWest(), BorderLayout.WEST);
		this.getContentPane().add(getJLabel(), BorderLayout.CENTER);
	}

	// 좌측 목록 JPanel 생성
	public JPanel getPWest() {
		if(pWest == null) {
			pWest = new JPanel();
			pWest.setLayout(new GridLayout(2, 1));
			pWest.add(new JScrollPane(getListString()));
			pWest.add(new JScrollPane(getListImage()));
		}
		return pWest;
	}

	// 텍스트 목록을 갖는 JList 생성
	public JList getListString() {
		if(listString == null) {
			String[] items = {
					"Cantaloupe", "Grapefruit", "Grapes", "Kiwi", "Peach",
					"pineapple", "strawberry", "tomato", "watermelon"
			};

			listString = new JList(items);
			listString.addListSelectionListener(new ListSelectionListener() {
				public void valueChanged(ListSelectionEvent e) {
					if(!e.getValueIsAdjusting()) {
						int selectedIndex = listString.getSelectedIndex();
						ImageIcon image = new ImageIcon(
								getClass().getResource("fruit" + (selectedIndex + 1) + ".jpg"));
						getJLabel().setIcon(image);
					}
				}
			});
		}
		return listString;
	}

	// 이미지 목록을 갖는 JList 생성
	public JList getListImage() {
		if(listImage == null) {
			Vector items = new Vector();
			for(int i=1; i<10; i++) {
				ImageIcon image = new ImageIcon(
						getClass().getResource("fruit" + i + ".jpg"));
				items.addElement(image);
			}

			listImage = new JList(items);
			listImage.addListSelectionListener(new ListSelectionListener() {
				public void valueChanged(ListSelectionEvent e) {
					if(!e.getValueIsAdjusting()) {
						ImageIcon image = (ImageIcon) listImage.getSelectedValue();
						getJLabel().setIcon(image);
					}
				}
			});
		}
		return listImage;
	}

	// 선택된 항목의 이미지를 보여주는 JLabel 생성
	public JLabel getJLabel() {
		if(jLabel == null) {
			jLabel = new JLabel();
			jLabel.setHorizontalAlignment(jLabel.CENTER);
		}
		return jLabel;
	}


	public static void main(String[] args) {
		SwingUtilities.invokeLater(new Runnable() {
			public void run() {
				JListExample jFram = new JListExample();
				jFram.setVisible(true);
			}
		});
	}
}
(2) JComboBox
▷ 버튼을 클릭하면 항목이 나열되고 그 중 하나를 선택할 수 있음
▷ 항목은 배열로 주거나 Vector 객체로 줄 수 있음(텍스트와 이미지 모두 가능)
◎ JComboBox를 이용한 사진 선택 예제
import java.awt.BorderLayout;
import java.awt.Color;
import java.awt.event.ActionEvent;
import java.awt.event.ActionListener;
import java.util.Vector;

import javax.swing.ImageIcon;
import javax.swing.JComboBox;
import javax.swing.JFrame;
import javax.swing.JLabel;
import javax.swing.JList;
import javax.swing.JPanel;
import javax.swing.SwingUtilities;

public class JComboBoxExample extends JFrame {
	private JPanel pNorth;
	private JComboBox comboString;
	private JComboBox comboImage;
	private JLabel jLabel;

	// 메인 윈도우 설정
	public JComboBoxExample() {
		this.setTitle("JComboBoxExample");
		this.setDefaultCloseOperation(JFrame.EXIT_ON_CLOSE);
		this.getContentPane().setBackground(Color.white);
		this.getContentPane().add(getPNorth(), BorderLayout.NORTH);
		this.getContentPane().add(getJLabel(), BorderLayout.CENTER);
		this.setSize(250, 200);
	}

	// 상단 목록 JPanel 생성
	public JPanel getPNorth() {
		if(pNorth == null) {
			pNorth = new JPanel();
			pNorth.add(getComboString());
			pNorth.add(getComboImage());
		}
		return pNorth;
	}

	// 텍스트 목록을 갖는 JComboBox 생성
	public JComboBox getComboString() {
		if(comboString == null) {
			String[] arrString = {
					"Cantaloupe", "Grapefruit", "Grapes", "Kiwi", "Peach",
					"pineapple", "strawberry", "tomato", "watermelon"
			};

			comboString = new JComboBox(arrString);
			comboString.setBackground(Color.WHITE);
			comboString.addActionListener(new ActionListener() {
				public void actionPerformed(ActionEvent e) {
					int selectedIndex = comboString.getSelectedIndex();
					ImageIcon image = new ImageIcon(
							getClass().getResource("fruit" + (selectedIndex + 1) + ".jpg"));
					getJLabel().setIcon(image);
				}
			});
		}
		return comboString;
	}

	// 이미지 목록을 갖는 JList 생성
	public JComboBox getComboImage() {
		if(comboImage == null) {
			Vector vImage = new Vector();
			for(int i=1; i<10; i++) {
				ImageIcon image = new ImageIcon(
						getClass().getResource("fruit" + i + ".jpg"));
				vImage.add(image);
			}

			comboImage = new JComboBox(vImage);
			comboImage.setBackground(Color.WHITE);
			comboImage.addActionListener(new ActionListener() {
				public void actionPerformed(ActionEvent e) {
					ImageIcon image = (ImageIcon) comboImage.getSelectedItem();
					getJLabel().setIcon(image);
				}
			});
		}
		return comboImage;
	}

	// 선택된 항목의 이미지를 보여주는 JLabel 생성
	public JLabel getJLabel() {
		if(jLabel == null) {
			jLabel = new JLabel();
			jLabel.setHorizontalAlignment(jLabel.CENTER);
		}
		return jLabel;
	}

	public static void main(String[] args) {
		SwingUtilities.invokeLater(new Runnable() {
			public void run() {
				JComboBoxExample jFram = new JComboBoxExample();
				jFram.setVisible(true);
			}
		});
	}
}
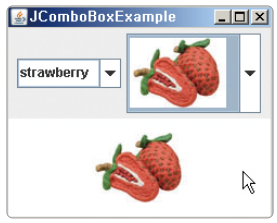
JList, JComboBox 기능을 이용해서 사진을 선택하면 JPanel에 출력되도록 만들어보았습니다.
이미지 파일과 배치만 잘하면 더 가독성 있게 표현할 수 있겠어요!
많은 분들의 피드백은 언제나 환영합니다! 많은 댓글 부탁드려요~~

728x90