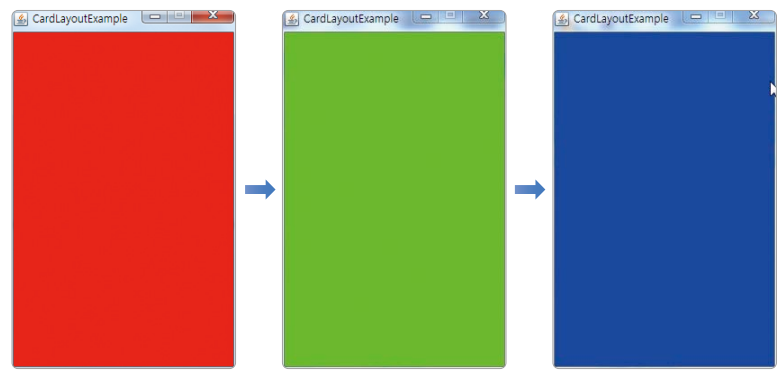
(4) CardLayout
▷ 여러 장의 카드를 포개 놓고 한 번에 하나의 카드를 보여주는 역할을 함, 카드는 하나의 JPanel로 구성됨.

| No | CardLayout 메소드 | 설명 |
| 1 | first(Container container) | 첫 번째 배치한 카드를 보이게 한다. |
| 2 | last(Container container) | 마지막에 배치한 카드를 보이게 한다. |
| 3 | next(Container container) | 현재 카드 다음에 배치한 카드를 보이게 한다. |
| 4 | show(Container container, String name) | 지정된 이름의 카드를 보이게 한다. |
◎ CardLayout 사용 예제
package component;

import java.awt.CardLayout;
import java.awt.Color;

import javax.swing.JFrame;
import javax.swing.JPanel;
import javax.swing.SwingUtilities;

public class CardLayoutExample extends JFrame {

	private JPanel redCard, greenCard, blueCard;

	// 메인 윈도우 설정
	public CardLayoutExample() {
		this.setTitle("CardLayoutExample");
		this.setSize(250, 400);
		this.setResizable(false);
		this.setDefaultCloseOperation(JFrame.EXIT_ON_CLOSE);

		// CardLayout으로 변경하고 3개의 카드 추가
		this.getContentPane().setLayout(new CardLayout());
		this.getContentPane().add("RedCard", getRedCard());
		this.getContentPane().add("GreenCard", getGreenCard());
		this.getContentPane().add("BlueCard", getBlueCard());
	}

	// RedCard에 해당하는 JPanel 생성
	public JPanel getRedCard() {
		if(redCard == null) {
			redCard = new JPanel();
			redCard.setBackground(Color.RED);
		}
		return redCard;
	}

	// RedCard에 해당하는 JPanel 생성
	public JPanel getGreenCard() {
		if(greenCard == null) {
			greenCard = new JPanel();
			greenCard.setBackground(Color.GREEN);
		}
		return greenCard;
	}

	// RedCard에 해당하는 JPanel 생성
	public JPanel getBlueCard() {
		if(blueCard == null) {
			blueCard = new JPanel();
			blueCard.setBackground(Color.BLUE);
		}
		return blueCard;
	}

	public static void main(String[] args) {
		SwingUtilities.invokeLater(new Runnable() {
			public void run() {
				final CardLayoutExample jFrame = new CardLayoutExample();
				jFrame.setVisible(true);
				// 반복 스레드 생성
				Thread thread = new Thread() {
					@Override
					public void run() {
						for(int i=0; i<10; i++) {
							try {
								// 2초간 일시정지
								Thread.sleep(1000);
							} catch (InterruptedException e) {
							}
							// 이벤트 큐에 Runnable 객체 넣기
							SwingUtilities.invokeLater(new Runnable() {
								@Override
								public void run() {
									// CardLayout을 얻어 다음 카드 보여주기
									CardLayout cardLayout =
											(CardLayout) jFrame.getContentPane().getLayout();
									cardLayout.next(jFrame.getContentPane());
								}
							});
						}
					}
				};
				// 반복 스레드 시작
				thread.start();
			}
		});

	}
}
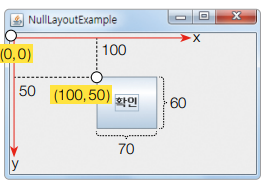
(5) NullLayout
▷ NullLayout은 컨테이너의 setLayout() 메소드에 배치 관리자 대신 매개값을 null로 설정한 것을 말함
▶ 어떠한 배치 관리자도 사용하지 않고 좌표값으로 컴포넌트를 배치함
▷ x, y 매개값은 픽셀 단위의 좌표값인데, 컨테이너의 좌 측 상단이 (0, 0)이고 우측이 x축, 하단이 y축
▷ x의 최대값은 컨테이너의 폭이고, y의 최대값은 컨테이너의 높이
width 매개값은 컴포넌트의 폭을 말하고, height 매개값은 컴포넌트의 높이를 말함
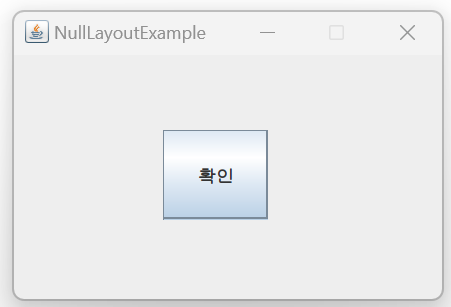
◎ NullLayout 사용 예제
import javax.swing.JButton; import javax.swing.JFrame; import javax.swing.SwingUtilities; public class NullLayoutExample extends JFrame { private JButton btnOk; // 메인 윈도우 설정 public NullLayoutExample() { this.setTitle("NullLayoutExample"); this.setSize(300, 200); this.setResizable(false); this.setDefaultCloseOperation(JFrame.EXIT_ON_CLOSE); // NullLayout 설정과 버튼 추가 this.getContentPane().setLayout(null); this.getContentPane().add(getBtnOk()); } // 버튼 생성 public JButton getBtnOk() { if(btnOk == null) { btnOk = new JButton(); btnOk.setText("확인"); // 버튼이 위치할 좌표값과 폭과 높이 설정 btnOk.setBounds(100, 50, 70, 60); } return btnOk; } public static void main(String[] args) { SwingUtilities.invokeLater(new Runnable() { public void run() { NullLayoutExample jFrame = new NullLayoutExample(); jFrame.setVisible(true); } }); } }
(6) Pack
▷ java.awt.Window를 상속받는 최상위 레벨 컨테이너는 pack() 메소드를 사용해
내부의 컴포넌트의 크기에 맞게 컨테이너의 크기를 자동으로 조절할 수 있음
▷ 컴포넌트의 PreferredSize 속성은 컴포넌트의 기본 배치 크기를 말함
▷ getPreferredSize()를 호출해서 컴포넌트의 기본 배치 크기를 알아낸 뒤, 컨테이너의 크기를 계산
▷ setSize()는 직접 컨테이너의 폭과 높이를 설정, pack()은 내부 컴포넌트의 크기에 따라 컨테이너의 크기 결정
▷ 따라서 pack() 메소드를 호출하는 시점은 컨테이너에 컴포넌트들이 모두 배치가 끝난 시점이어야 함
◎ Pack 사용 예제
import java.awt.FlowLayout;
import javax.swing.JButton;
import javax.swing.JFrame;
import javax.swing.SwingUtilities;

public class PackExample extends JFrame {
	private JButton btnOk;
	private JButton btnCancel;

	// 메인 윈도우 설정
	public PackExample() {
		this.setTitle("FlowLayoutExample");
		this.setDefaultCloseOperation(JFrame.EXIT_ON_CLOSE);

		// FlowLayout으로 변경하고 버튼 추가
		this.setLayout(new FlowLayout());
		this.getContentPane().add(getBtnOk());
		this.getContentPane().add(getBtnCancel());

		// pack() 메소드 호출
		// 컴포넌트의 배치에 따른 크기를 계산해서 컨테이너 크기를 지정
		this.pack();
	}

	// Ok 버튼 생성
	private JButton getBtnOk() {
		if(btnOk == null) {
			btnOk = new JButton();
			btnOk.setText("확인");
		}
		return btnOk;
	}

	// Cancel 버튼 생성
	private JButton getBtnCancel() {
		if(btnCancel == null) {
			btnCancel = new JButton();
			btnCancel.setText("취소");
		}
		return btnCancel;
	}

	public static void main(String[] args) {
		SwingUtilities.invokeLater(new Runnable() {
			public void run() {
				PackExample jFrame = new PackExample();
				jFrame.setVisible(true);
			}
		});
	}
}

자바의 Swing을 이용한 레이아웃 배치 방법에 대해서 추가적으로 배워보았습니다.
아래의 글과 비교해 보았을 때 다양한 레이아웃이 있는 것을 확인하실 수 있겠죠?
https://bobo12.tistory.com/210
[java] 이것이 자바다 부록 Java UI 2 (컴포넌트 배치 1)
컴포넌트 배치 컨테이너에는 UI 컴포넌트(버튼, 체크박스, 라디오 버튼, 콤 포, 리스트 등)들이 배치됩니다. 컨테이너는 기본적으로 배치 관리자로 컴포넌트를 배치한다. 배치 관리자는 좌표값으
bobo12.tistory.com
많은 분들의 피드백은 언제나 환영합니다! 많은 댓글 부탁드려요~~

'BackEnd > Java' 카테고리의 다른 글
| [java]이것이 자바다 부록 Java UI 5 (Swing을 이용한 버튼 컴포넌트) (0) | 2023.02.16 |
|---|---|
| [java]이것이 자바다 부록 Java UI 4 (Swing을 이용한 이벤트 처리) (0) | 2023.02.16 |
| [java] 이것이 자바다 부록 Java UI 2 (Swing을 이용한 컴포넌트 배치 1) (0) | 2023.02.15 |
| [java] 이것이 자바다 부록 Java UI 1 (Swing) (0) | 2023.02.15 |
| [java] 이것이 자바다 부록 MySQL과 연동 (0) | 2023.02.15 |


