728x90
1. watch란?
데이터의 수식이나 값이 변할 때 어떤 처리를 하고 싶을 때 사용합니다.
예제를 통해서 바로 알아보겠습니다.
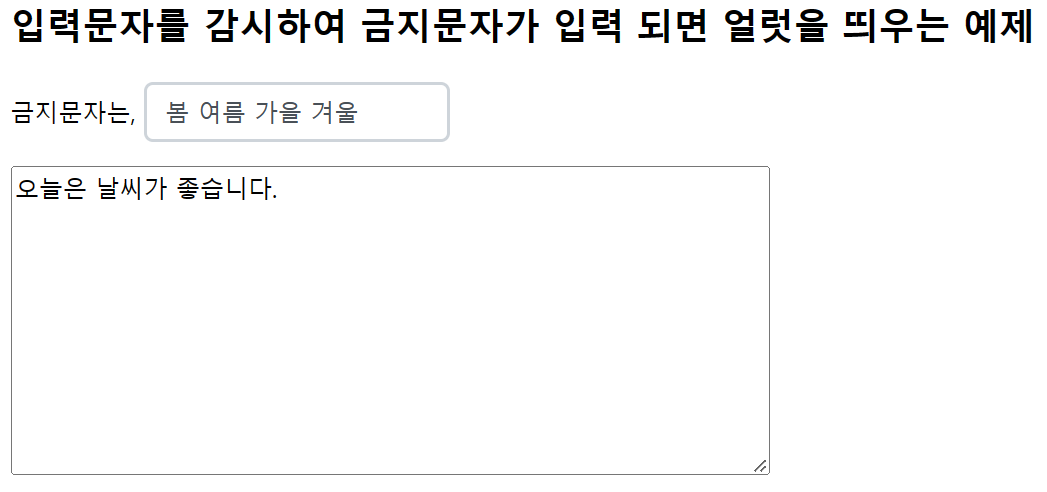
◎ 입력문자를 감지하여 금지문자가 입력되면 alert를 띄우는 예제
<!DOCTYPE html>
<html>
	<head>
		<meta charset="UTF-8">
		<title>Vue.js sample</title>
		<link rel="stylesheet" href="style.css" >
		<script src="https://cdn.jsdelivr.net/npm/vue@2.5.16/dist/vue.js"></script>
	</head>

	<body>
		<h2>입력문자를 감시하여 금지문자가 입력 되면 얼럿을 띄우는 예제 </h2>
		<div id="app">
			<p>금지문자는、「{{ forbiddenText }}」</p>
			<textarea  v-model="inputText"></textarea>
		</div>

		<script>
			new Vue({
				el: '#app',
				data: {
					forbiddenText: '안되',
					inputText: '오늘은 날씨가 좋습니다.'
				},
				watch: {
					// 입력한 문자열을 감시한다.
					inputText: function(){
						var pos = this.inputText.indexOf(this.forbiddenText);
						if (pos >= 0) {
							alert(this.forbiddenText + "는 입력할 수 없습니다.");
							// 입력문자에서 금지 문자를 삭제한다.
							this.inputText = this.inputText.substr(0,pos);
						}
					}
				}
			})
		</script>
	</body>
</html>
'안돼'라는 단어를 입력하면 경고창이 뜨는 예제입니다.
여기서 watch를 통해 입력된 글자가 변하는 것을 감지할 수 있고 substr(0, pos)를 사용해 inputText라는 변수에 금지 글자를 제외하고 남을 수 있도록 만듭니다.
여기서, substr의 특징은
str.substr(시작 인덱스, 추출 개수) : 시작 인덱스를 몇 개 추출할 것인지 입력을 받습니다.
유사한 것으로는 substring입니다.
str.substring(시작 인덱스 번호, 끝 인덱스 번호) : substring은 시작 인덱스 번호, 끝 인덱스 번호를 입력받습니다.

여기서 여러 글자를 금지문자로 지정하고 싶다면,
<script>
	new Vue({
		el: '#app',
		data: {
			forbiddenText: ['안돼', '내일은', '저는'],
			inputText: '오늘은 날씨가 좋습니다.'
		},
		watch:{
			inputText: function(){
				for(var i=0; i<this.forbiddenText.length; i++){
					var pos = this.inputText.indexOf(this.forbiddenText[i]);
					if(pos >= 0){
						alert(this.forbiddenText[i] + "는 입력할 수 없습니다.");
						this.inputText = this.inputText.substr(0, pos);
					}
				}
			}
		}
	})
</script>
금지 문자를 배열로 입력 받고 for문을 이용해서 과정을 하나씩 거쳐주면 됩니다.
이렇게 하면 '안돼, 내일은, 저는'이라는 글자는 입력하면 바로 삭제됩니다.
<script>
	new Vue({
		el: '#app',
		data: {
			forbiddenText: [],
			inputText: '오늘은 날씨가 좋습니다.'
		},
		watch:{
			inputText: function(){
				var newText = this.forbiddenText.split(' ');

				for(var i=0; i<newText.length; i++){
					var pos = this.inputText.indexOf(newText[i]);
					if(pos >= 0){
						alert(newText[i] + "는 입력할 수 없습니다.");
						this.inputText = this.inputText.substr(0, pos);
					}
				}
			}
		}
	})
</script>
이번에는 제가 forbiddenText를 입력하면 해당 값은 사용할 수 없게 만듭니다.
이때 split 함수를 이용해서 배열을 생성합니다.
'봄 여름 가을 겨울'이란 글자는 빈칸으로 구분되어서 배열로 받습니다. 총 4개의 배열이 생기고 해당 글자들은 입력할 수 없게 됩니다.

◎ 추가로 금지문자를 버튼을 통해 배열로 넣어주는 예제
<!DOCTYPE html>
<html lang="ko">
<head>
	<meta charset="UTF-8">
	<meta name="viewport" content="width=device-width, initial-scale=1.0">
	<title>Document</title>
	<link rel="stylesheet" href="style.css" >
	<script src="https://cdn.jsdelivr.net/npm/vue@2.5.16/dist/vue.js"></script>
</head>
<body>
	<h2>입력문자를 감시하여 금지문자가 입력되면 얼럿을 띄우는 예제</h2>
	<div id="app">
		<input v-model="forbiddenText"><button v-on:click="addNum">버튼</button>
		<p>금지 문자는, {{ forbiddenList }} 입니다.</p>
		<textarea v-model="inputText">{{ inputText }}</textarea>
	</div>
	<script>
		new Vue({
			el: '#app',
			data: {
				inputText: '오늘은 날씨가 좋습니다.',
				forbiddenText: '',
				forbiddenList: []
			},
			methods: {
				addNum: function(){
					this.forbiddenList.push(this.forbiddenText);
					this.forbiddenText = '';
				}
			},
			watch: {
				inputText: function(){
					for(var i=0; i<this.forbiddenList.length; i++){
						var pos = this.inputText.indexOf(this.forbiddenList[i]);
						if(pos >= 0){
							alert(this.forbiddenList[i] + "는 금지 문자입니다.")
							this.inputText = this.inputText.substr(0, pos);
						}
					}
				}
			}
		})
	</script>
</body>
</html>
버튼을 넣으면 금지 문자가 하나씩 추가되면서 해당 글자는 입력할 수 없게 됩니다.
◎ 남은 시간이 0초가 되면 alert를 띄우는 예제(Vue.js 사용 x)
<!DOCTYPE html>
<html>
	<head>
		<meta charset="UTF-8">
		<title>Vue.js sample</title>
		<link rel="stylesheet" href="style.css" >
		<script src="https://cdn.jsdelivr.net/npm/vue@2.5.17/dist/vue.js"></script>
	</head>

	<body>
		<h2>남은 시간이 0초가 되면 얼럿을 띄우는 예제 </h2>
		<button onclick="startTimer()">START</button>

		<script>
			function startTimer(){
				this.restSec = 5;
				this.timerObj = setInterval(() => { countDown() }, 1000)
			}

			function countDown() {
				this.restSec --;
				if(this.restSec <= 0){
					alert("제한 시간 입니다.");
					clearInterval(this.timerObj);
				}
			}

		</script>
	</body>
</html>
◎ 남은 시간이 0초가 되면 alert를 띄우는 예제(Vue.js 사용)
<!DOCTYPE html>
<html>
	<head>
		<meta charset="UTF-8">
		<title>Vue.js sample</title>
		<link rel="stylesheet" href="style.css" >
		<script src="https://cdn.jsdelivr.net/npm/vue@2.5.17/dist/vue.js"></script>
	</head>

	<body>
		<h2>남은 시간(초)를 감시하여 표시하고 0초가 되면 얼럿을 띄우는 예제</h2>
		<div id="app">
			<p>앞으로 {{ restSec }}초<br></p>
			<button v-on:click="startTimer">START</button>
		</div>

		<script>
			new Vue({
				el: '#app',
				data: {
					restSec: 5,
					timerObj: null
				},
				methods:{
					startTimer:function(){
						this.restSec = 5;
						this.timerObj = setInterval(() => {this.restSec-- }, 1000)
					}
				},
				watch:{
					restSec: function(){
						if(this.restSec <= 0){
							alert("제한시간 입니다.");
							clearInterval(this.timerObj);
						}
					}
				}
			})
		</script>
	</body>
</html>
◎ show를 누르고 5초가 지나면 문구가 나타나고 hide를 누르고 2초 지나면 문구가 사라지는 예제
<!DOCTYPE html>
<html>
	<head>
		<meta charset="UTF-8">
		<title>Vue.js sample</title>
		<link rel="stylesheet" href="style.css" >
		<script src="https://cdn.jsdelivr.net/npm/vue@2.5.17/dist/vue.js"></script>
	</head>

	<body>
		<h2>남은 시간(초)를 감시하여 표시하고 0초가 되면 얼럿을 띄우는 예제</h2>
		<div id="app">
			<p>앞으로 {{ restSec }}초<br></p>
			<button v-on:click="showTimer">Show</button>
			<button v-on:click="hideTimer">Hide</button>
			<p v-if="tf">5초 뒤 실행 된 화면</p>
		</div>

		<script>
			new Vue({
				el: '#app',
				data: {
					restSec: 5,
					timerObj: null,
					select: 0,
					tf: false
				},
				methods:{
					showTimer:function(){
						this.restSec = 5;
						this.select = 1;
						this.timerObj = setInterval(() => {this.restSec-- }, 1000)

					},
					hideTimer:function(){
						this.restSec = 2;
						this.select = 2;
						this.timerObj = setInterval(() => {this.restSec-- }, 1000)
					}
				},
				watch:{
					restSec: function(){
						if(this.restSec <= 0){
							if(this.select == 1){
								this.tf = true;
							} else{
								this.tf = false;
							}
							clearInterval(this.timerObj);
						}
					},
				}
			})
		</script>
	</body>
</html>
show 버튼을 누르면 5초 뒤에 '5초 뒤 실행 된 화면'이라는 문구가 출력되고 hide 버튼을 누르면 2초 뒤에 문구가 사라집니다.
여기서 select라는 변수를 사용해서 restSec가 0이 되면 select의 값을 받아서 원하는 결과가 출력될 수 있도록 만듭니다.

일단 여기까지 watch를 이용한 예제 풀이를 하고 다음 글에서 한 번 더 다뤄볼게요~!!
728x90
'FrontEnd > java script' 카테고리의 다른 글
| [java script] Vue.js 데이터 변화(computed, watch)를 이용한 마무리 예 (0) | 2022.12.28 |
|---|---|
| [java script] Vue.js 데이터 변화 감지 프로퍼티(watch 2) (0) | 2022.12.27 |
| [java script] Vue.js 데이터를 사용한 계산 2 (computed) (0) | 2022.12.27 |
| [java script] Vue.js 데이터를 사용한 계산(computed) (0) | 2022.12.26 |
| [java script] Vue.js의 구글 차트란? (0) | 2022.12.26 |


